
My wife and I were discussing going back to the US to live & work for a few years and needed someplace to store our stuff. Her uncle is renovating his house right now and we talked about just adding a small room to his house for storage. Well, things did not work out for going back to the US, so I was kind of blowing off the room idea. Then somehow it morphed into adding a room to live at their house. Generally I would advise not living too close to relatives – I am in favor of the 2 island away from family rule ha ha. But these guys are ok (so far). The more we discussed it with uncle he said a free standing building would be better than attaching a room. He did not want to block airflow to his house and if we build our own we can face it correctly for the prevailing winds.
The original idea was a 15 foot by 15 foot room. That would be like a hotel room, and we would use their kitchen and cr (comfort room = bathroom). Well in a free standing house we will need our own kitchen and cr. Which has many benefits, I think. So I played around with a free program called “Sweet Home 3D”. A free download and free program (they have upgrades you can pay for). I drew out a 15×15 room and added furniture… tight but doable. Then I added on a kitchen area, and a walled off cr. Here is the basic idea. There are no real plans or blueprints involved – it is really just a room.

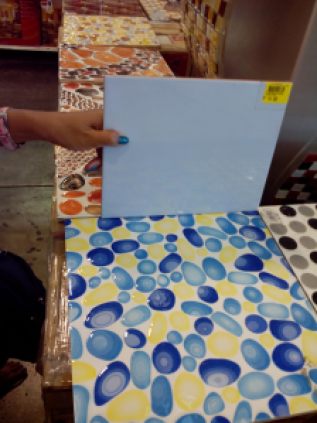
The pic above, of the tile, is what we are considering for the cr. I tend to favor neutral colors and rely on my decor for decor, but these tile were the only tiles that got Melane excited at all. The Citi Hardware store has an extremely limited choice of toilets and bathroom sinks, but a HUGE selection of floor & counter tiles. She was getting frustrated looking at all the tile until she saw this and really likes them. And I think they are terribly cute too.
So we told uncle to work out a price. He works as an electrician and knows a bunch of guys in construction. So he is going to be kind of the general contractor. I will post the estimate of the cost and later show how that worked out. This supply list is for the main building, ceiling, and roof. It does not include things like floor tile or plumbing fixtures. I want to pick those out myself and the cost can vary greatly, depending on our choices.

p127,000 is about $3,000 USD. Close enough for government work. Did you notice he put “good lumber”? That is better than buying “crappy lumber” I guess. The labor is an additional p50,000 ($1,100). Construction is supposed to take about a month, and there are 4(?) workmen. We are not paying a daily wage but a set price for the job. In the US it would be just a contract price, here they call it something that sounds like pacquiao style payment. It is not supposed to have anything to do with the boxer… but they cannot tell me what it exactly means. And I tried Google to no avail. But anyway a flat rate payment works for me. Easier to budget. ~Edit~ Someone just informed me that it’s actually spelled ‘pakyaw’ which means by the bulk.
So far we are looking at about $4,000 for supplies and labor. Floor tile, and plumbing fixtures come later. Cost of them and labor yet to be determined. I looked at toilets and found a nice, big, American sized, toilet for p9,500 ($220?!). Seems high to me but it is an import. A standard Filipino toilet looks like it belongs in an Elementary school bathroom, and you would be lucky to have a seat or a flush tank. I have few demands but a sit down toilet and a stand up shower are important. So I will pay it, whatever it cost. Floor tile will be approx p9,000 for the tiles. Most are about one foot square and cost around p40 each ($1). I don’t know about the mortar, tile installation… that comes later….
Construction began at the first of June. They say one month (I am not holding my breathe ha ha). Here is the beginning of construction. I was pleased to see that they began pouring cement for the columns on day 2. Not a bad start. And yes, they mix the cement on the ground with shovels. No cement mixers needed here!


I took a couple videos. I hope to get a lot more during the construction.
~Edit~ 30MAY2019 As I update this page, I thought to add the YT Playlist. It is currently 24 vids. It has all the construction, the cost, and some improvements. Construction Playlist Link


Recomend a pressure tank, if you have a power shower or washing machine (front loader) its essential, we had ours rigged so the water goes to tank via pump after which its split to either th e house or high tank via a set of open close valves
Hi Tim,
Got your YouTube link from mike my buddy over at My Philippinejourney, I was very interested and liked your series on your home construction. Great series! I my self am a retired disabled expat married now for two years here in Iloilo. I took over the completing of my wife’s Small home that was started when she was working in Kuwait before we met. In my case a close comparison to yours, a lot of the work was done by my brother in laws,one a carpenter one an electrician,cousins that were masonry men.
So my labour cost was extremely low about p300 per day, but had to force them to take payment or just push it in their pockets lol. I found material prices very cheap in comparison to the US and the Cayman Islands where I came from.(I am American by birth). The only complaint that I had is that when the house was started it was not well thought out or planned(some head aches!!!)
However being a draftsman( as well as a computer tech) I was able to redesign the as built structure(using Chief Architect) and add a bit of additional comfort and more usable space(other than what was intended, two rooms and a sitting space. Your series gave me a better understanding and insight on how the construction was apparently started and answered some of my questions as to why some parts of the construction was done the way it was.(I took over construction direction after the walls and roof was on, floor not poured and second floor was already started.). Although very small about 500sq.ft. both floors we now have two bedrooms a kitchen a CR and a eating and sitting area. Like I said small but has the comforts one would need, not to include easy to keep lol for her that is. I liked your series as I said because it also gave me insight on how your space was utilized. Did you ever do a video on the complete interior layout? Would like to see it as well as your pressure tank setup. I’m still getting the interior done, as you know finish work is the longest and most expensive part of any home construction.
We actually don’t have a pressure tank. I would like to get one. All we have is a pressure switch on the pump. It fills the lines up to pressure (unsure of the setting). With a tank you have more expansion so the pump does not cycle so much during the showers.
We do have a tank on the roof for water storage (it is on the house next door). We use it during brown outs. But it is an open plastic drum, would not work as a pressure tank.
Built our large 3 bed bungalow near Iloilo 4 years ago for approximately 1.1 mil peso’s, couple of lessons for guys planning this, make sure you buy the materials yourself, see lots of people (locals and expats) come to grief when contractor takes money for build but puts it all on credit with building supplier, pocketing the money. also learned the hard way that contract price can often mean the builder thinks he can turn up whenever, (i.e. between jobs leaving days in between, so get it clarified that you want every day to save grief). The good news is that it is worth it, waking up to our view with coffee and pandasal a relaxing start to the day.
contact us jim.We are into construction and interior decoration. 09776385175
Hey Joe Pinoy….:)
I’m planning on building maybe a 2-story….. 18 x 20 footer.
How do I contact you???
thanks..
Jim
This structure should have cost you no more than $1300, with CR, and a concrete roof that would last forever, or become the upper floor when you decided you needed more room.
Ah yes… Seen this so very many times. Of course you are tossing tones of cash to the wind, do you care?
This is a single story structure, and even if it were a 2 story house, that foundation pier footing is just over 20 times what is needed.
And, I am sure you did the calculations as to the number of stirrups (those horizontal bands around your re-bar) you would need to prevent the bar from popping out under vertical pressure. the proper amount is… NONE! Since there is no top loading, there is no vertical load, and, well… You did the calculations as to the least amount of bar as well (NOT). Concrete is cheap, bar expensive (to install and buy), so if your column was bigger your need for bar is less, could I suggest a column that was 4″ by 18″?
The next thing I will see is form work so crappy that it MUST be plastered. This is so because the idea is that labor will be needed to plaster. Not particularly good for the owner but way way better for the workers. And, because of so many stirrups, you will not be able, due to segregation, to cast in sections over 5 feet tall.
After the posts, comes the crappy form work for the footing for the block. You must have a quality footing to support the crappy quality of block. I am sure no carpenter there would suggest that you cast the footing high enough to diminish the use of block, and make a stronger footing, NO WAY!
I cry for you Schnitzel.